|
What's in a name?
Raku and the Tea Ceremony
Western Raku
Raku - American Style
In Closing ...
The Raku Firing Process
The Pit Firing Process
The History of Raku
What's in a name?- - - - - - - - - - - - -
Raku or "happy circumstance" as it is sometimes known in the West, has a very different connotation in Japan.
The very beginning of the art of Raku started in 16th century Japan. The name "Raku" was bestowed on Jokei, the son of a Korean immigrant potter living in Kyoto. Jokei's father, Chojiri Raku, was chosen by Senno-Rikyu (AD 1522-91), a prominent tea master, to produce pottery for the Zen Buddhist tea ceremonies. It was Senno-Rikyu who established the "wabi" concept, which is loosely translated as austerity or simplicity.
Originally taken from the Chinese, the Raku character was inscribed on a presentation gold seal. This Raku artwork was developed as a direct result of the Japanese tea ceremony.
Translations vary, but in simplistic terms, Raku symbolized contentment, pleasure, enjoyment and a direct and honest approach one should have toward the external elements in order to reach enlightenment.
In the West, the happy circumstance of Raku has a different meaning. We loosely use the term 'Raku' as a firing method with a wide degree of outcomes. You can produce exactly the same piece of pottery, glaze it exactly the same, and 'Raku' it (kiln fire) and each pot will be different, or happy circumstance. So, Raku has come to be known as being happy with that moment in time and the results obtained within the moment.
Raku and the Tea Ceremony- - - - - - - - - - - - - - - - - -
The importance of Sado, or in Japanese tea ceremony terms—"Way of Tea," embraces both philosophical and religious thinking. This influence was very important to the Japanese culture from AD1550-1850 and it is, even today, held very sacred and highly regarded in Japan.
The English actually invented the term 'tea ceremony' but the original custom was a relaxed event simply called Cha-no-yu or "hot water for tea.' These ceremonial connotations were later formalized to a more stylized ritual.
The religious and cultural roots of 'the Way with Tea'—Sado—stem from Zen Buddhism. Samauai masses rejected the opulant, ostentatious trappings of the imperial court and, therefore, were attracted to Zen's simplicity and austerity. It also correlated with the pursuit of personal enlightenment, was encouraged by military discipline, and emphasized weaponry expertise.
Monks, in the Zen Buddhist temples of China, thought tea consumption aided meditation. The Japanese, who appreciated the simplicity of this pottery, soon began to make them for their own use.
In Japan throughout the 15th century, Zen spread widely, penetrating into the masses, as well as religious culture. Tea ceremonies assumed greater importance and the Shogun Yoshimasa built the first tea house or chashitsu.
Tea masters were considered very important and were involved in every detail and aspect from the design of the tea house to the utensils and vessels used. Tea masters were also very involved and held responsible for setting the mood of the tea ceremony and all of its activities (before and after).
For the fortunate chosen guests, the primary objective was to integrate harmony and all the physical elements of a peaceful atmosphere to achieve tranquility, harmony, and above all, enlightenment.
Western Raku- - - - - - - - - - - - -
Bernard Leach is credited with bringing Raku to the West. In 1911, he was taken to a garden party in Tokyo which included a tea ceremony and also participation in a Raku firing—his first pottery experience. Making Raku pottery after the tea ceremony was considered a recreational aspect of the afternoon. Bernard Leach describes his experiences in more detail in his famous 1940 publication, A Potter's Book.
Bernard Leach continued experimenting with different Raku processes, i.e., decorating, brush strokes, different glazes. He make a living at holding classes advertising to 'paint you own pots' and offering guidance in decorating them. This was an opportunity for him to learn when keeping his studio open. This was a perfect artistic way to spend an afternoon, as the decorating and firing could be done in one afternoon and the customer could take home a completed piece of decorated pottery with them that very afternoon. The Leach Pottery ceased Raku firings around the mid-1930's.
Raku-American Syle- - - - - - - - - - - - -
As best as is documented, Warren Gilbertson was the first potter to make Raku in the United States. He worked in Japan for two years and in 1940 he returned to the U.S. and was invited to stage an exhibition in Chicago. This is where his first Raku pieces were shown.
In 1942, Gilbertson presented a paper describing the Raku technique to the American Ceramic Society, but just like Bernard Leach, he did not take the method too seriously and treated it rather as a process reserved for amateurs and somewhat as a novelty or craft. Unfortunately, this very talented man died in a car accident in 1954. Therefore, the years between 1940&3150;1960 were not well documented regarding Raku in the United States.
In 1954, Peter Voulkos, a rising star in ceramic education and exploration, was appointed to head the graduate program at the Los Angeles County Art Institute. Voulkos was given a free hand in establishing the curriculum from the beginning. He was quite a dynamic figure. He insisted that the department be open 24/7 thus creating an atmosphere and environment of creative freedom and innovative thinking and encouraged students to take chances and to explore the unknown.
One of the first of these trail-blazing students was Paul Soldner. At age 33—he was already a few years older than Voulkos—Soldner begin by building the studio to suit his needs, exploring new materials and building wheels. This was the start of his very successful company, Soldner Pottery Equipment (still in business today after 40 years!). Soldner is credited with having revolutionized pottery technology, designing and introducting new and innovative equipment and developing the art of Raku and their techniques to new levels. He challenged conventions and pushed back boundaries, always curious, always energenic and with enthusiasm which has sustained him for more than 40 years. His pottery is just gorgeous.
In Closing ...- - - - - - - - - - - - -
Raku today is widely taught in college campuses and local high schools. There are also many private studios offering classes and instruction in various applications of ceramics.
Once you experience its magical, Zen-like qualities, you never want to stop.
Claygirl® is a federally registered trademark.
Copyrighted © 2000. All rights reserved.
Unauthorized use of any images and/or text on this site is strictly prohibited.
The Raku Firing Process- - - - - - - - - - - - - - - - - - - - - - - - - - - - - - - - - - -
|
|
|
This is the first step in the Raku firing process. If this is the first Raku firing of the day, the Raku kiln needs to be brought to temperature as well as the pottery you are about to Raku slowly and evenly. If you are firing smaller pieces, you can set the pottery around the Raku kiln and in this way the pottery will warm slightly as the kiln is heating up. This will also help to dry any Raku glaze that might be still damp on your pieces. In this way, you will avoid breakage and cracking of your bisque because the bisque pottery has been brought to temperature slowly. It will also prevent your pottery from bursting and ruining other people's artwork. The average Raku kiln is normally about 18-24" in Diameter.
|
The Raku Process
Raku ... is my favorite form of artistic ceramic expression right now. Raku has captured my heart and my passion. No two pieces are exactly alike. Raku, in Western culture, is translated to mean "happy circumstance" in that each and every time you Raku your pottery, you will get a different result. So, be happy with it!
|
|
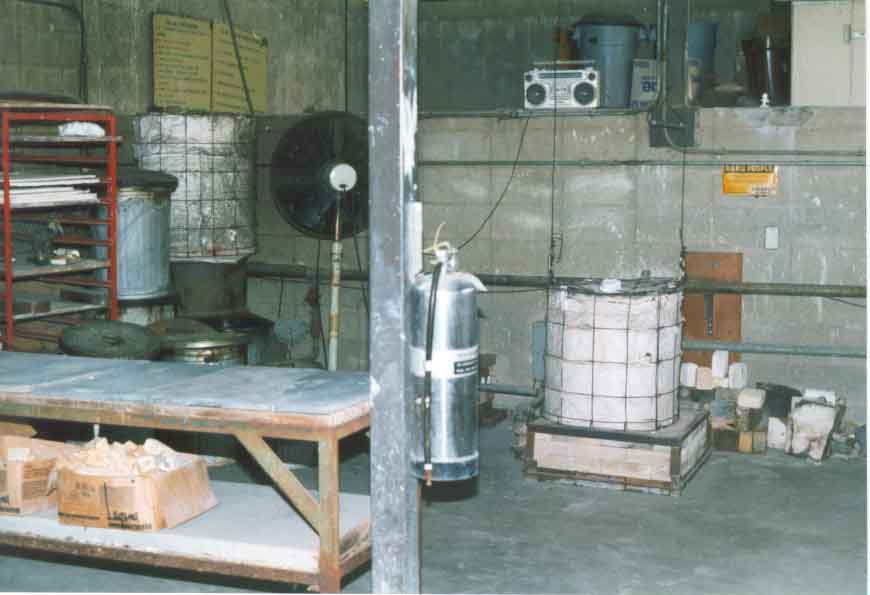
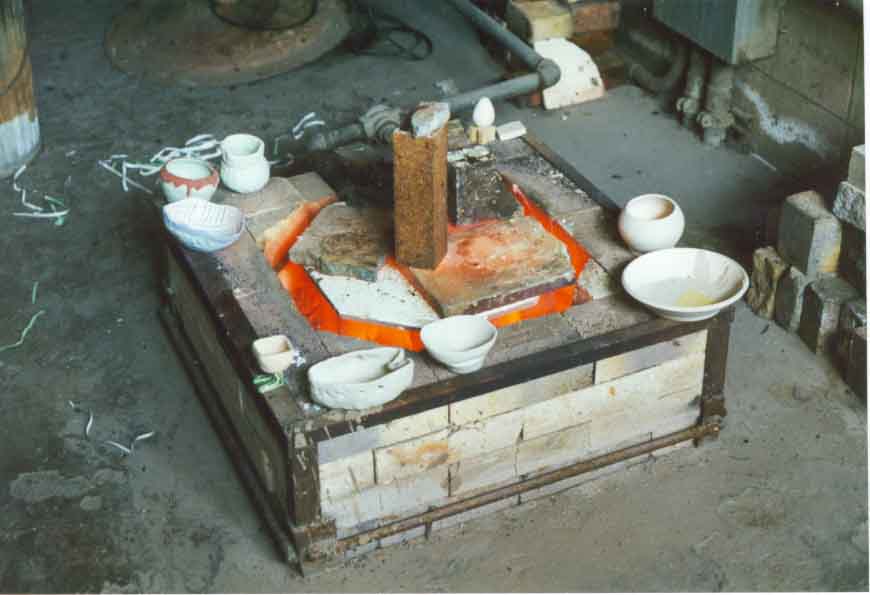
This is a typical Raku kiln and the area around the kiln.
The wastebaskets used here are for the reduction process.
The fan is for any smoke encountered during the process.
And, the fire extinguisher is required for safety purposes.
|
|
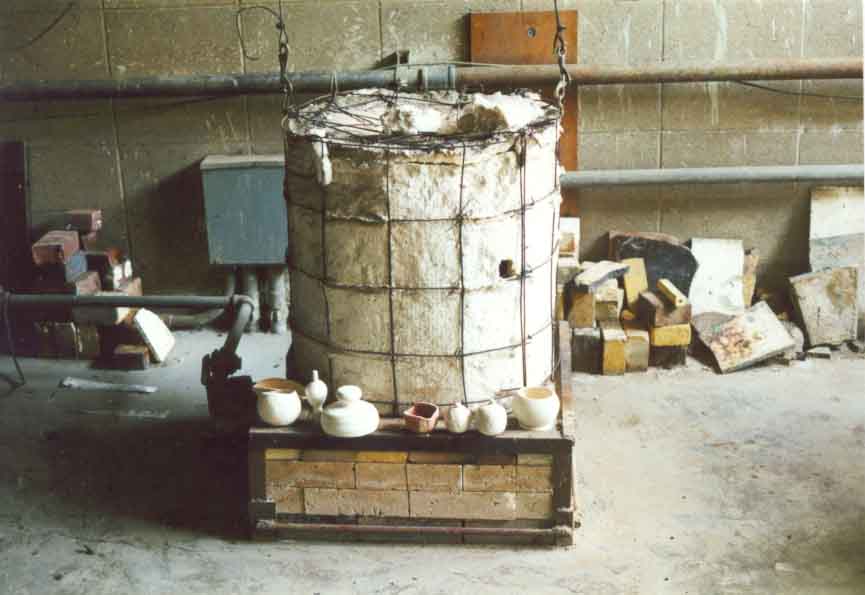
A loaded Raku kiln ready for firing.
The tall stilt is where the firing cone sits.
This cone bends as the heat increases in the kiln.
When the cone is bent at a 90° angle, the kiln is said to be
‘at temperature’ and you should then start to
remove the pottery into the reduction chambers.
|
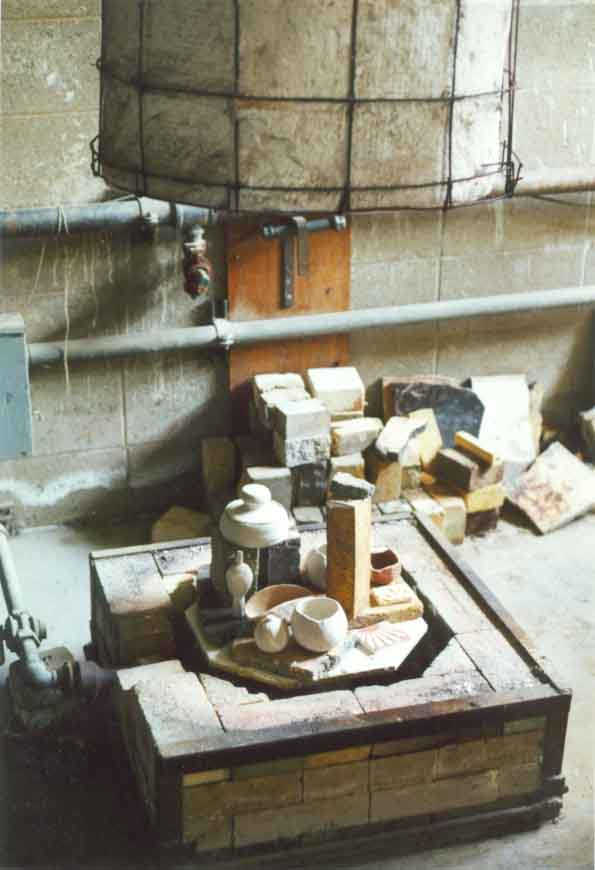
Care should be taken when loading the kiln to ensure that the kiln can be closed and that no pieces are touching each other or touching the inside walls of the kiln. Also, no piece should be fired on top of another piece as the glaze could run and ruin the underneath pottery. Also, sufficient holes in the kiln covering have been left for ventilation.
|
|
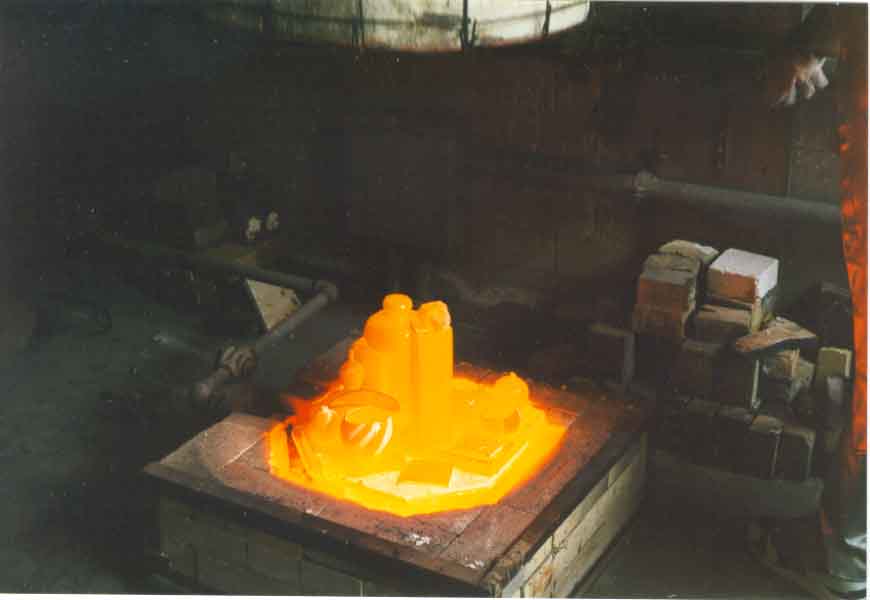
After reaching temperature, the pottery is now ready to be put
into the reduction chambers. Protective clothing—regulation
gloves, coat, boots, and hat with protective goggles
are highly suggested.
|
|
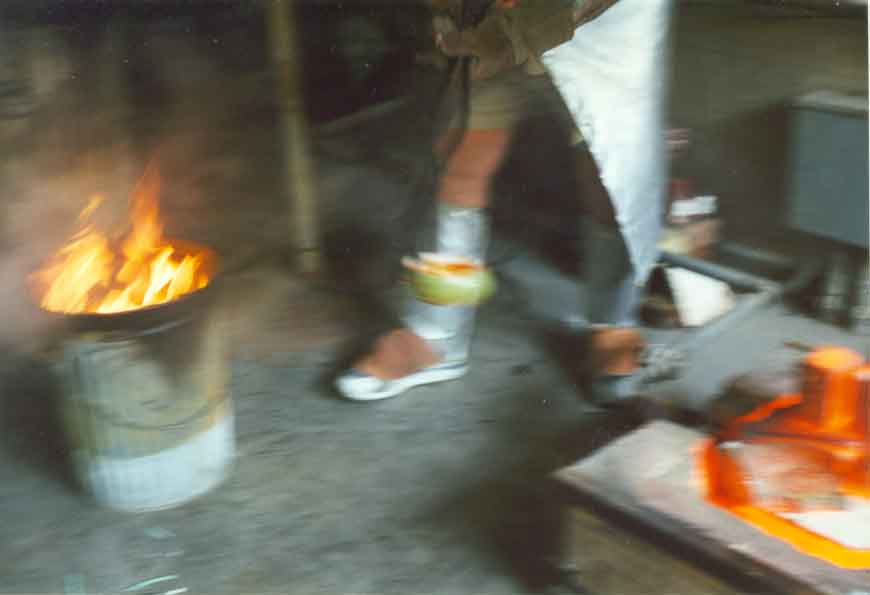
Ceramic tongs are used to remove fired pottery from the kiln
to the reduction chambers. The pottery can spontaneously
burst or can be dropped and the resulting injury could be
very serious. Notice the protective gear worn.
|
Protective gear—gloves, boots, coat, and facial mask are highly suggested when removing the pottery from the kiln to the reduction chamber. At this point, the pottery is approximately 1850°.
|
|
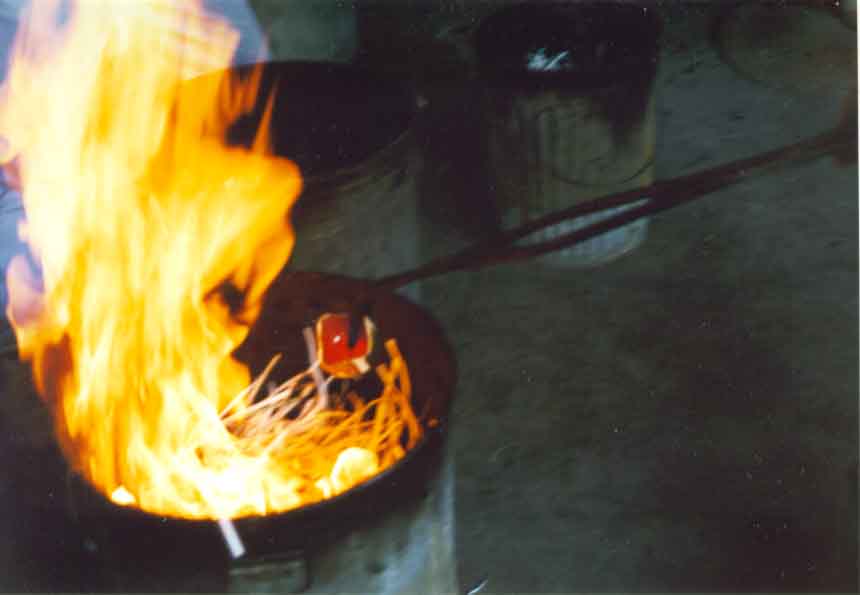
The pottery is being placed into a reduction chamber.
Notice how the combustible material ignites.
|
Combustible material can be shredded paper, leaves, pine cones, or saw dust, etc. The combustible material ignites immediately.
|
|
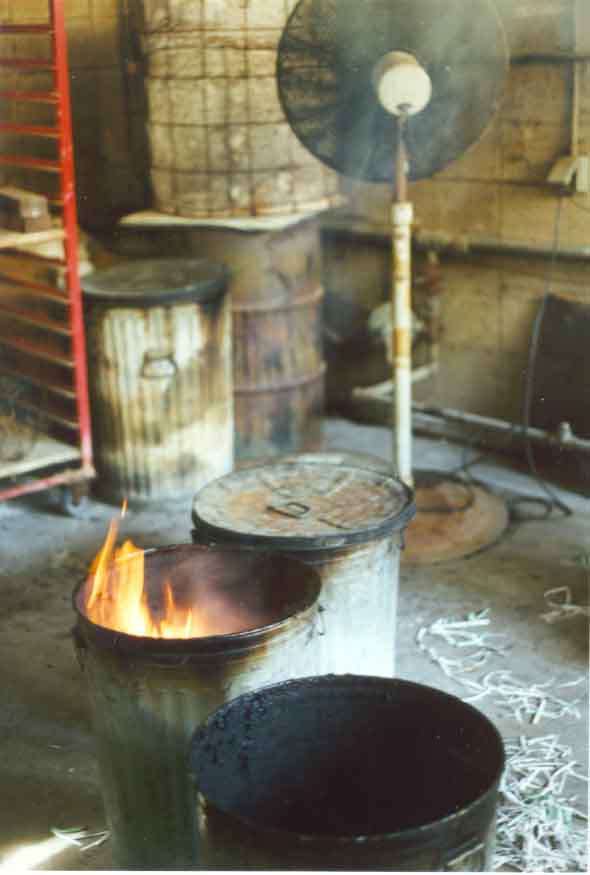
A fan is used to help eliminate the smoke caused by the
burning of the combustible material in the chambers. Reduction
is accomplished by sealing off the air supply suffocating
the pottery allowing the carbon to come to the surface of
the pottery. This causes the matte black surface on so
many Raku pieces.
|
|
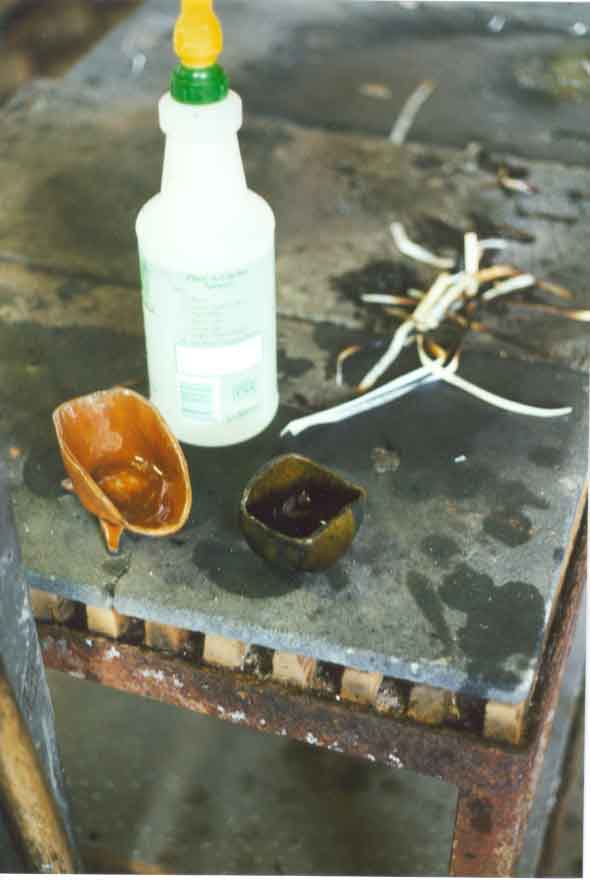
A slate table is used for hot pottery taken from the
reduction chamber. The pottery is still too hot to
handle by the human hand without glove protection.
Water can be sprayed to help increase the crack of
the glaze and it also helps to cool the pottery faster.
|
Tongs are again used to remove the pottery from the reduction chamber and placed on a heat resistant surface (slate or concrete is good). Once the pottery has cooled, the pottery is then ready to be washed thoroughly as a film of tar has accumulated on the piece during the reduction process. Common kitchen cleaners with mild abrasives can be used.
|
|
The Raku process repeats.
|
Usually the Raku process is done in batch mode, taking advantage of the kiln already warmed from the previous firing. The pottery is again placed around the kiln to help facilitate temperature shock.
|
Claygirl® is a federally registered trademark.
Copyrighted © 2000. All rights reserved.
Unauthorized use of any images and/or text on this site is strictly prohibited.
The Pit Firing Process- - - - - - - - - - - - - - - - - - - - - - - - - - - - - - - - - -
|
|
|

This is the first step in the beach pit fire. Basically, you gather tons of materials including wood (various sizes for quick and slow burning) and sawdust if you want it, shovels, rakes, some type of fencing (usually found in junk yards) as this helps support the logs and wood from laying too heavy on the pottery, pottery tongs, high temperature protective gloves and masks, and a water bucket for cleaning. All pottery pieces must be bisqued and unglazed.
|
The Pit-Firing Process
Another process of pit firing is saggar firing. In the saggar firing process, the pottery pieces are placed into a container usually a metal can of some sort, and wrapped with combustible material (your pottery pieces can be wrapped with organic/inorganic materials such as tortilla shells, fertilizer, manure, and copper wire if desired). Fire fuels can be used such as small wood chips, sawdust, or pine needles—anything combustible.
|
|
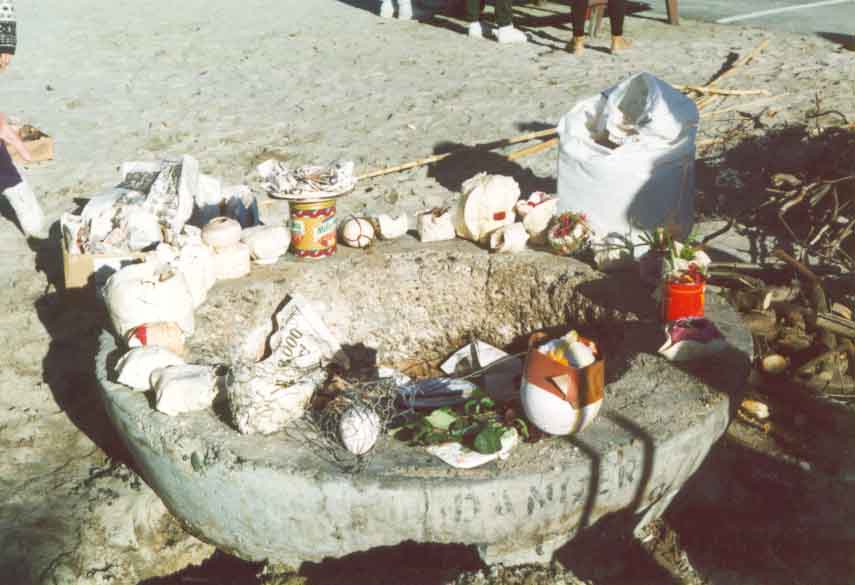
After everyone has gathered at the beach, all the unglazed pottery to
be fired is placed around the pit to determine how much can be
fired in this pit or if another pit is required.
|
|
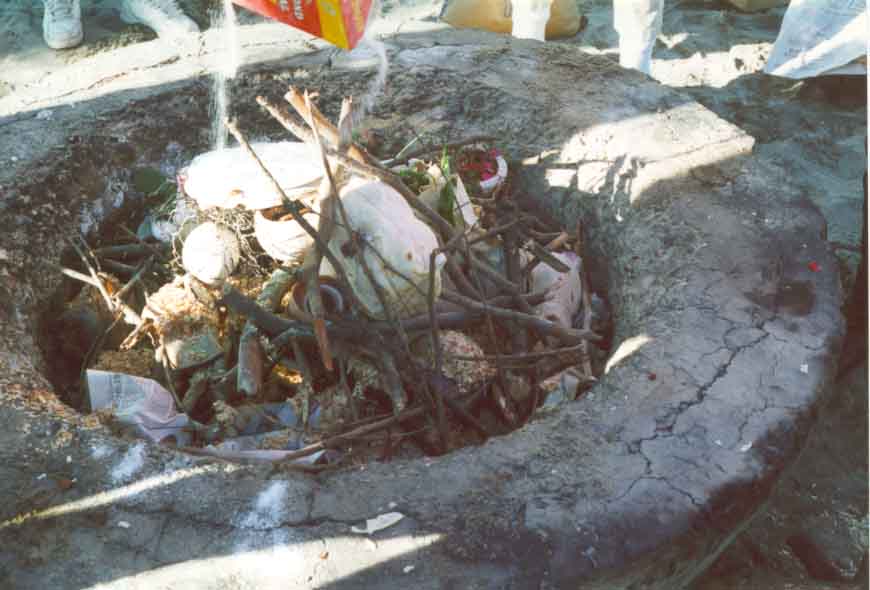
Use metal fencing to help support and protect the
pottery from the weight of the wood. Carefully place
small pieces of wood all around the pit. Gradually,
add larger pieces of wood in a circular, cone-like fashion.
|
The pottery is carefully placed in the pit. It is best to have scraps of metal fencing to help support the wood and also to protect the pottery from breakage. A tunnel is dug in the sand underneath the pit for ventilation. You can add your additives at this point, i.e., fertilizer, etc. Great care is taken to not damage the environment.
|
|
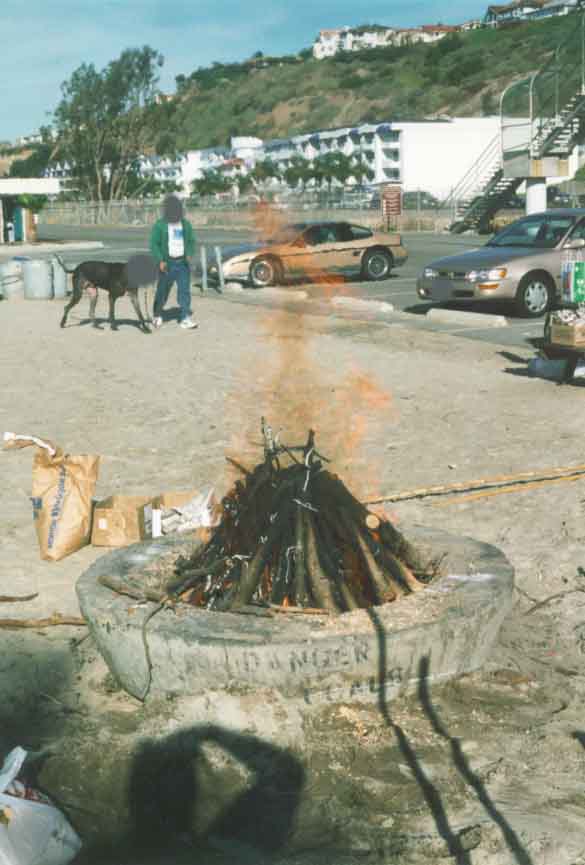
The firing process begins. Notice how the
wood logs are coned toward the center of the fire.
The flames are reaching maximum height.
Hi Harry and Houston!
|
|
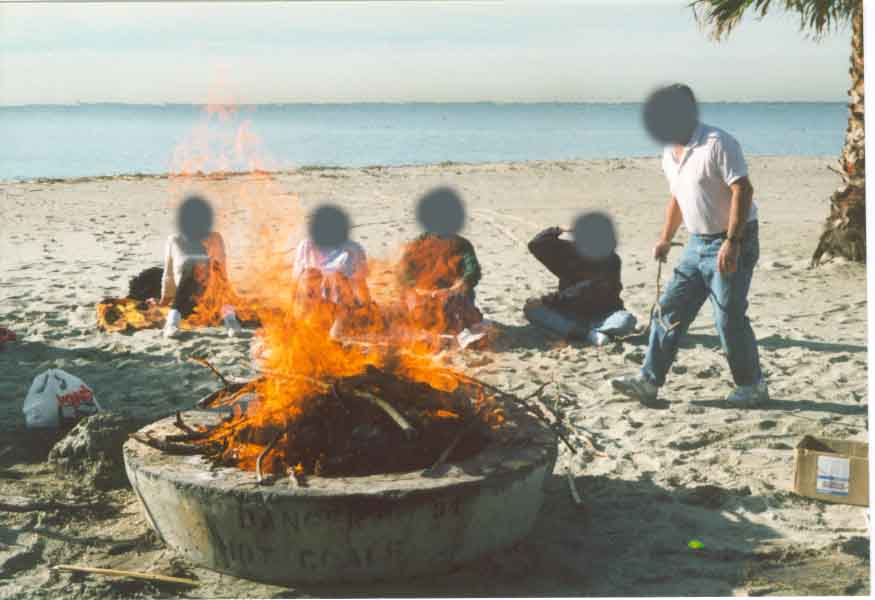
Maximum temperature is being reached and the flames
are 6 feet. It's time to relax and have
lunch or take a walk on the beach!
|
Additional combustible materials, mainly in the form of wood twigs and logs are continually added to the fire until temperature has been reached—depending on atmospheric conditions, usually within 2-3 hours. Care must be taken when adding additional combustibles to not break the pottery underneath.
|
|
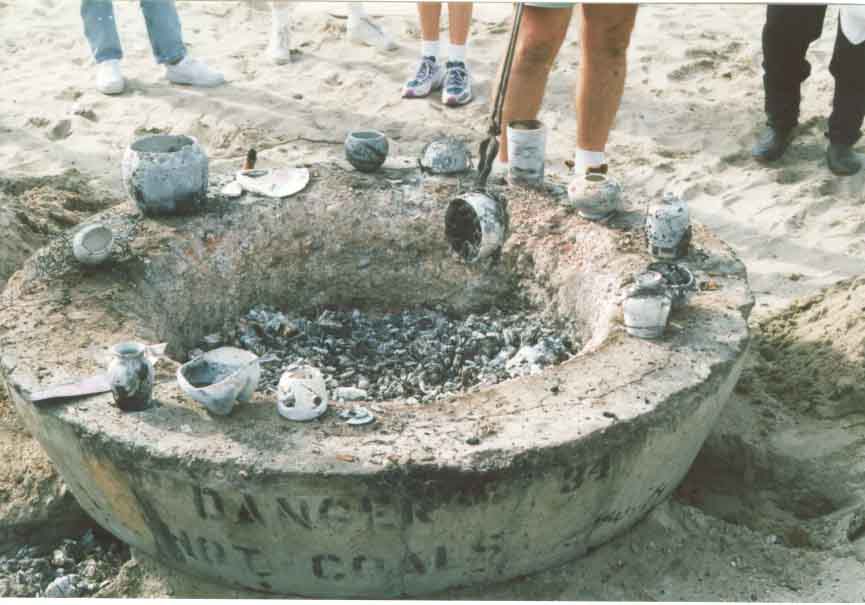
After the firing, the ashes are allowed to cool for about an hour. The pottery is still very hot and protective gloves and tongs are required.
|
After the fire is out, carefully lift the pottery using tongs. The pottery is extremely hot and should not be touched by unprotected hands.
|
|
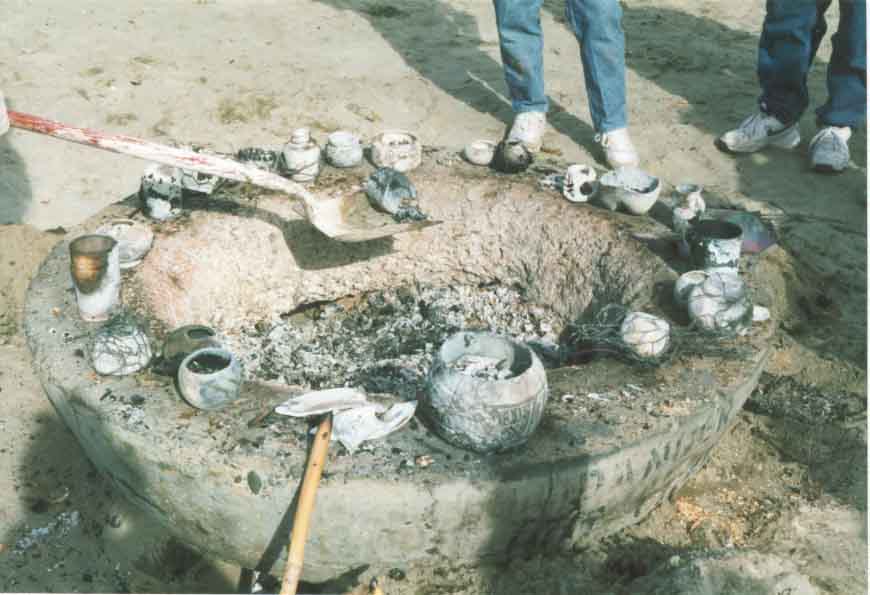
Using a shovel helps lift the pottery from the ashes.
|
|
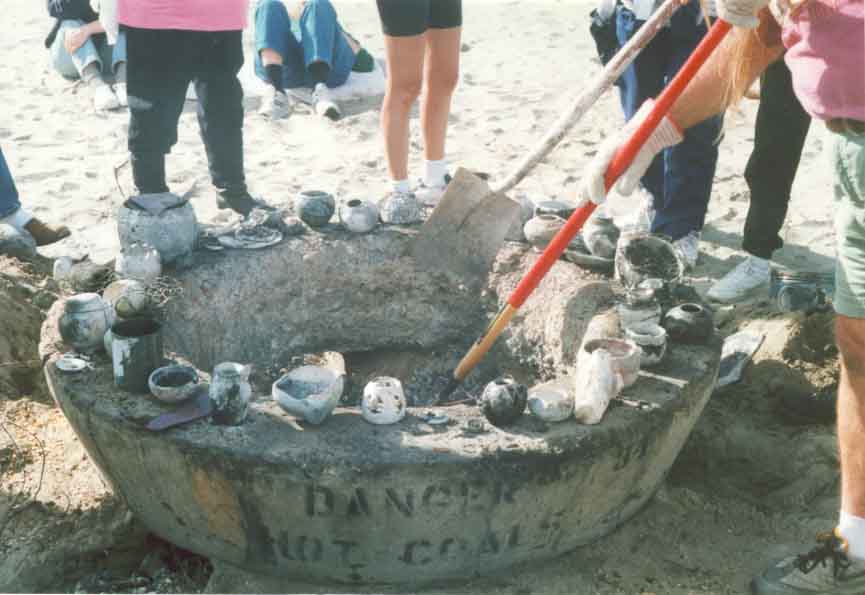
A shovel and/or rake is used in search of pottery pieces.
|
Careful examination of the pit in search of pieces of pottery that may be buried in the sand. The pottery is still very hot and should not be touched by unprotected hands.
|
|
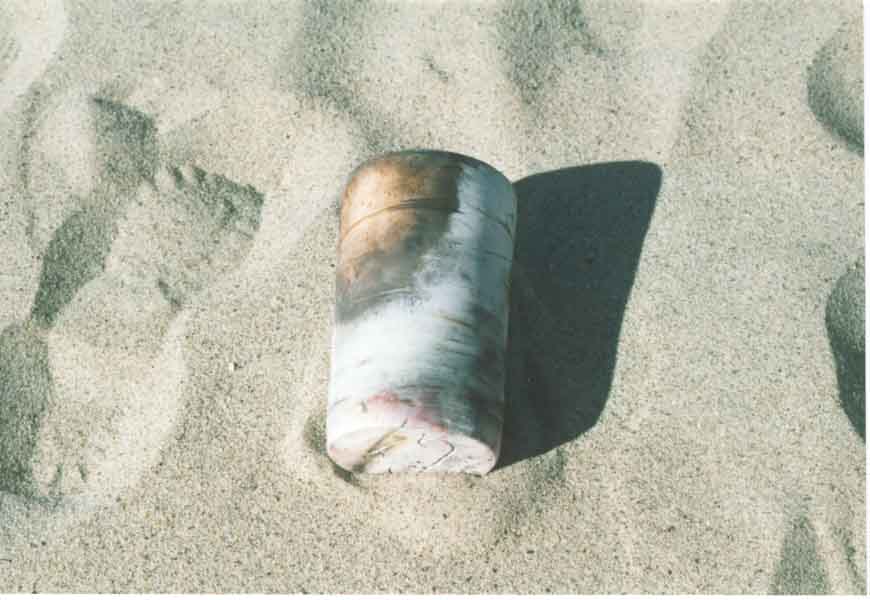
An unglazed, pit fired piece of pottery.
|
A front view of a finished piece of pit fired pottery. As there is no glaze applied, the finish is matte and the colors are muted. The pottery is hot for at least an hour after removing from the pit and handling should be kept to a minimum until cooled.
|
|
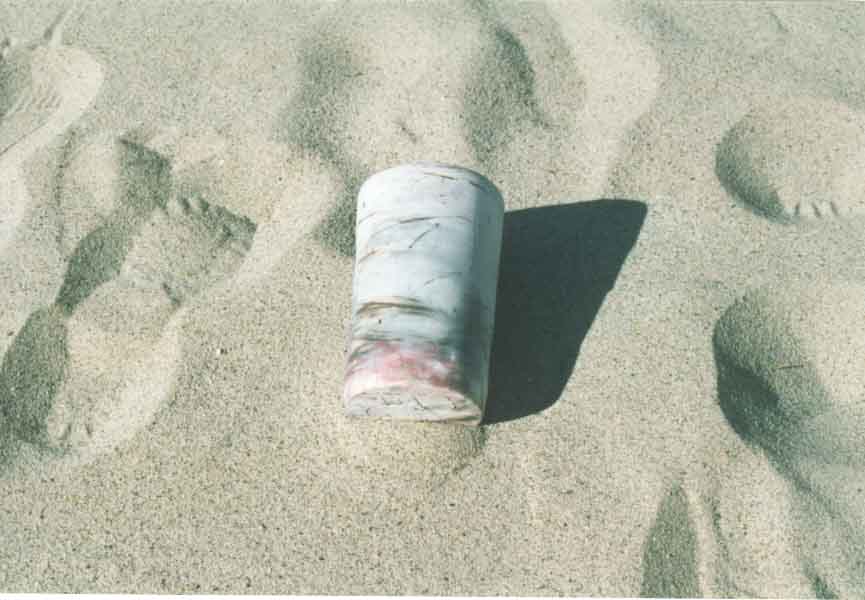
Notice the inconsistent, muted colors.
The red/pink colors are very hard to produce.
|
Laying the pottery in the sand helps to clean it (the sand acts as an abrasive) and also allows the pottery to cool slowly.
|
|
Home •
Pot Shop •
Raku/Pit Fire •
Firing Info •
Techniques •
Links •
Glossary •
Artist •
Contact Me
|
Claygirl® is a federally registered trademark.
Copyrighted © 2000. All rights reserved.
Unauthorized use of any images and/or text on this site is strictly prohibited.
| |